
CIRS Remediation Guide
Chronic Inflammatory Response Syndrome (CIRS) is a complex and debilitating condition often triggered by exposure to biotoxins such as mold from water-damaged buildings. For those living with CIRS, the healing journey starts with one crucial step: removing yourself from the source of exposure. This foundational aspect, highlighted in the Shoemaker Protocol, sets the stage for effective healing and symptom management.
In this CIRS Remediation Guide, we’ll explore the critical importance of eliminating exposure as the first and most essential step. We’ll also take a closer look at the best remediation practices to ensure your environment is safe and conducive to healing. From identifying potential sources of biotoxins to employing effective remediation techniques, this guide covers all the vital steps you need to take.
Additionally, we will explain the unique considerations that CIRS patients must keep in mind, helping you navigate the nuances of creating a safe and healthy living space. Whether you’re just beginning your CIRS journey or looking to enhance your current remediation efforts, this guide offers invaluable insights to support your root-cause healing journey.
What Is CIRS?
Chronic Inflammatory Response Syndrome (CIRS) is a multifaceted condition that affects multiple bodily systems with a variety of symptoms. This disorder arises from extensive inflammation due to an overactive immune response. Recognized as a legitimate medical condition, diagnosing CIRS requires detailed lab tests and a thorough review of the patient’s medical history.
The diverse symptoms of CIRS often lead to misdiagnoses or ineffective treatments. Unlike typical immune disorders that involve abnormal adaptive immune responses, CIRS cannot be detected through standard autoimmune blood tests. Therefore, an in-depth and specialized diagnostic approach is essential for accurate identification and management of this condition.
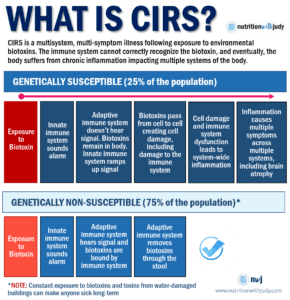
What triggers the heightened immune response and widespread inflammation associated with CIRS? The primary culprits are biotoxins—naturally occurring toxic substances. These biotoxins, responsible for initiating and exacerbating CIRS, originate from various sources, including:
- Water-Damaged Environments: Around 80% of CIRS cases are linked to exposure to air in water-damaged buildings. These environments harbor mold mycotoxins, bacteria, and other chemical irritants that can trigger inflammatory responses in susceptible individuals. Both living and dead mold components significantly contribute to inflammation in the body and brain.
- Insect Bites: Bites from certain insects, such as ticks and spiders, can lead to chronic conditions such as Lyme disease. Pathogens like Borrelia burgdorferi and Babesia microti, along with venom from recluse spider bites, can cause prolonged health issues.
- Seafood Consumption: Eating tropical reef fish contaminated with ciguatera toxin, associated with Pfiesteria and harmful algae blooms like cyanobacteria (blue-green algae), can lead to biotoxin-related illnesses. This toxin accumulates in larger reef fish that consume smaller fish which have ingested dinoflagellates.
- Contact with Contaminated Water: Exposure to or inhalation of water contaminated with toxic algae blooms, including Pfiesteria and cyanobacteria, can trigger the inflammatory responses characteristic of CIRS.
- Other Biotoxin Sources: Additional triggers for CIRS include exposure to certain vaccines, viruses, volatile organic compounds (VOCs), endotoxins, and actinomycetes. These elements can all contribute to the development and exacerbation of the syndrome.

Biotoxins are microscopic molecules capable of penetrating cell membranes, making them challenging to detect with standard blood tests. These toxins usually enter the body through inhalation but can also be introduced via ingestion, insect bites, and direct contact with contaminated water.
Not everyone exposed to common biotoxins, such as mold, will develop Chronic Inflammatory Response Syndrome (CIRS). Genetic predispositions and life stressors significantly influence susceptibility to biotoxin-related conditions. Factors such as severe illnesses, surgeries, high fevers, pregnancies, substantial biotoxin exposure, and other traumatic events can trigger a cytokine storm. This may activate the CIRS gene in genetically susceptible individuals, especially those with HLA-DR genes, indicating that CIRS can develop at any point in life. It’s crucial to understand that the absence of symptoms does not mean immunity, and genetic testing can provide valuable insights for prevention.
While biotoxins might cause immediate illness, most people’s immune systems can identify and eliminate these toxins effectively. However, individuals genetically predisposed to CIRS have immune systems that fail to recognize and clear these toxins, allowing them to persist in the body. This leads to a chronic, severe immune reaction and widespread inflammation, resulting in a variety of symptoms and long-term health issues.
For a more detailed understanding of CIRS, click here.
Pro-Tip: If you think you’re suffering from CIRS, start with our White Glove Service for comprehensive care.
What Is the Shoemaker Protocol?
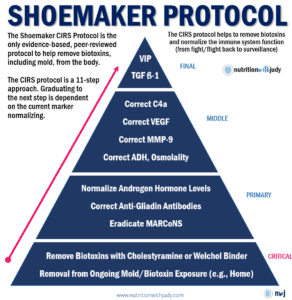
The Shoemaker Protocol is a comprehensive, evidence-based treatment designed to address CIRS and other biotoxin-related illnesses. Developed by Dr. Ritchie Shoemaker, this protocol stands out as the only peer-reviewed, clinically replicable treatment available for those suffering from biotoxin illnesses including mold illness. The protocol is grounded in rigorous scientific research and clinical trials, ensuring its effectiveness and reliability in treating patients with CIRS.
A critical aspect of the Shoemaker Protocol is its requirement of removing the patient from biotoxin exposure as the foundational step in the healing process. This initial step is crucial because ongoing exposure to biotoxins can continually trigger the inflammatory response, preventing any meaningful progress in treatment. Patients must either undertake thorough remediation of their living environments, relocate to a different home free from biotoxin contaminants, or create a designated sanctuary space within or outside their current residence. This sanctuary space must be meticulously maintained to ensure it remains free from biotoxins and provides a safe haven for recovery.
The Shoemaker Protocol outlines a structured approach to treatment that includes a series of steps beyond simply removing exposure. These steps involve specific medications and therapies to reduce inflammation, correct hormonal imbalances, and restore proper immune function. Each step is carefully designed to address the various aspects of CIRS, ensuring a holistic approach to treatment. By following this protocol, patients can achieve significant improvements in their health, often leading to complete remission of symptoms.
How Do I Know if I Need to Remediate My Home?
The first step in determining if your home requires remediation for mold is conducting an Environmental Relative Moldiness Index (ERMI) test. The ERMI test is considered the gold standard for mold environmental testing, especially for those dealing with CIRS. This comprehensive test provides a detailed analysis of mold presence in your home, helping to identify potential health risks.
If your home has known water damage, you might consider the HERTSMI-2 test. This test is more affordable and less comprehensive than the ERMI test, allowing you to allocate more funds towards the necessary inspection and remediation efforts. The HERTSMI-2 test focuses on detecting specific mold species associated with water damage, providing a cost-effective initial assessment.
Ideally, if finances allow, it’s beneficial to purchase both ERMI and endotoxin testing. Endotoxin testing complements the ERMI by identifying bacterial contaminants that can also trigger CIRS symptoms. Together, these tests offer a thorough evaluation of your home’s environmental health.
For individuals already aware of mold problems in their home, it may be best to skip the initial testing and proceed directly to the next steps of inspection and remediation. Addressing the known issues promptly can prevent further exposure and expedite the path to a healthier living environment.
You can learn more about home testing here. We also have a comprehensive ERMI Guide for in-depth interpretations of your results.

The Importance of Working With a Shoemaker IEP
Working with a Shoemaker-trained Indoor Environmental Professional (IEP) is crucial for anyone suffering from CIRS and looking to remediate their home environment. Unlike conventional mold remediation specialists, Shoemaker IEPs are specifically trained to understand the unique needs of CIRS patients and the complexities of biotoxin-related illnesses. Their specialized knowledge ensures that the remediation process is tailored to support the patient’s healing journey rather than inadvertently exacerbating their condition.
Conventional mold remediation practices, including the use of certain products and processes, can sometimes worsen the environment for individuals with CIRS. Typical methods often involve killing or denaturing mold, which can fragment the mold into smaller particles. These smaller fragments remain highly inflammatory and can more easily penetrate cell walls, posing a significant risk to CIRS patients. Additionally, once the mold is fragmented, it becomes much more challenging to completely remove from the property, increasing the likelihood of ongoing exposure and inflammation.
A Shoemaker IEP employs techniques that avoid these pitfalls, ensuring that remediation is conducted in a manner that genuinely reduces biotoxin exposure. You can find Surviving Mold’s Consensus Statement for Microbial Remediation here. This expertise is essential for creating a safe living environment that supports the healing process. By working with a Shoemaker IEP, you can ensure that every step of the remediation process is meticulously managed and executed correctly.
Shoemaker IEPs often work virtually, serving as project managers who collaborate with your local inspector and remediation company. They oversee the entire remediation process, ensuring that all actions taken align with the stringent standards required for CIRS patients. This oversight is vital for guaranteeing that the remediation efforts do not inadvertently increase biotoxin exposure and that your home becomes a safe sanctuary conducive to your recovery.
Pro-Tip: For a list of trusted Shoemaker IEPs, you can join our CIRS Support Group. You can also find a broader list of IEPs here. However, please note that some of these individuals are not Shoemaker certified, so make sure to confirm before engaging them.
CIRS Remediation Steps Overview
Here is a general overview of where each step should ideally take place during your remediation process. This isn’t standardized so your process may look different, but this outline serves as a jumping-off point so you can get an idea of what to expect.
- Find a Shoemaker-certified IEP and schedule either a virtual or in-person consultation.
- Schedule a mold inspection of your home with guidance from your Shoemaker IEP. If you’re working with your IEP in person, they may serve as your mold inspector.
- Go over the findings of your mold inspection with your Shoemaker IEP and create a remediation plan.
- Find a reputable remediation company that’s willing to forego conventional remediation methods, follow the plan created by your Shoemaker IEP, and follow any additional CIRS guidance.
- If you have carpets in your home that need to be removed, it’s best to do this before or during your remediation.
- Schedule your remediation and prepare your home for the process by moving personal belongings, getting rid of or storing items you don’t want small particle cleaned, and finding temporary accommodations if required.
- During the remediation, check in with your project manager daily and take notes on all the build-back requirements. Make sure to ask their opinions on what they think caused this issue initially so you can create a plan to solve these issues.
- You’ll need to notify your mold inspection company (or Shoemaker IEP if working with them in person) ahead of time to let them know the estimated dates for your project so they can get your post-clearance testing scheduled shortly after. Some remediation companies will guarantee their work based on post-clearance testing within a certain time frame of the work being completed— always ask to see if this is a benefit available to you.
- The mold inspection company or your Shoemaker IEP will need to conduct post-clearance testing of the remediated areas based on your Shoemaker IEP’s guidance. An ERMI is not a suitable alternative for this step and requires a third party to complete.
- Once all remediated areas pass post-clearance testing, it’s ideal to build back the home before the next steps. However, you likely won’t be able to occupy your property during this without the risk of exposure so most people do the build back after the small particle clean. Many people choose to complete the small particle clean before working on the build-back construction.
- It’s also ideal to get the air duct cleaning before the small particle clean. If you’re unable to coordinate this scheduling, the air duct cleaning can also be done after the small particle clean.
- We recommend doing a small particle clean of the entire home regardless of what areas were remediated. This is an important step for addressing all the toxic components and particles found in water-damaged buildings such as actinomyces (actinos) and endotoxins (endos). If AeroSolver isn’t a part of your small particle clean, make sure the initial actino deep clean is implemented during the small particle clean as well.
- If you weren’t able to coordinate steps 9 or 10 before the small particle clean, it’s best to schedule the air duct cleaning first and then take on your build-back requirements.
- After the build-back is completed, thoroughly HEPA vacuum and deep clean the respective areas. If you were unable to schedule your air duct cleaning in the previous two steps, schedule it after the build-back is complete.
- After 8-10 weeks post-remediation, do HERTSMI-2 testing as the final check. One HERTSMI-2 for all living areas usually suffices but if finances aren’t prohibiting, you can do one separate HERTSMI-2 test for each level. It’s important to ensure you’re sampling new dust after the remediation has taken place.
For nuanced details on every step required in the remediation process, you can find this information in our CIRS Support Group. Colorado residents also have a more streamlined process when it comes to CIRS remediation. This information is also available in our CIRS Support Group.
Important Remediation Tips for CIRS
As mentioned above, there are specific products and protocols required for properly remediating a property in order to create a safe environment for CIRS patients while they heal and are in remission.
Killing vs. Removing Mold
Do not use any products or devices that kill, sanitize, denature, or “neutralize” fungal or bacterial growth. With CIRS, exposures aren’t specific to certain species of mold or even mold that’s alive. Fragments of dead or dormant mold can still carry mycotoxins and are just as inflammatory to CIRS patients. Any practices that kill or denature mold only cause these organisms to break into smaller fragments that can actually penetrate the cell wall more easily and are more difficult to remove from the environment. Instead, the focus is to completely remove these particles from the environment.
Here are some examples of practices to avoid during remediation and ongoing maintenance:
- Ozone
- Fogging or bombing
- Zapping or UV
- Any natural antifungals or antimicrobials such as EC3
AeroSolver
AeroSolver is the only CIRS-approved misting solution. Its application is specifically for the small-particle clean of the environment after a successful remediation has taken place. AeroSolver captures and weighs down fine and ultrafine particles without corrosive oxidizers or free radicals. After the air is cleaned, the residue and offending particles on surfaces are removed via damp wiping and HEPA vacuuming before all other steps of the small-particle clean are completed. AeroSolver cannot be used in place of proper remediation as water-damaged materials must be completely removed from the home.
- AeroSolver Consideration: With proper application, there is no need for additional cleaning. However, some individuals have reported a slight residue left on surfaces from improper AeroSolver application (e.g., improper dilution applied). If you experience this, it’s important to ensure the complete removal of this residue as it contains toxic particles. Diluted ethanol (10%) from the liquor store, using either vodka or Everclear, should be used to wipe all surfaces that have this remaining residue. Make sure after cleaning that there isn’t any sticky or tacky feeling left on surfaces. This process may be repeated multiple times until the residue is completely removed. We don’t recommend doing this step yourself— it’s best to hire professional cleaners to address this for you. If that’s not an option, make sure to wear personal protection equipment (PPE); we have PPE recommendations also included in this guide.
- Ethanol and VOCs: Ethanol can produce VOCs that may be problematic— proper ventilation and air filters with charcoal will be needed to help with off-gassing. Most of the highly recommended air filters for CIRS do contain a charcoal component, just make sure there’s charcoal for specifically addressing VOCs.
Small Particle Cleaning and Air Duct Cleaning
Whole home small particle cleans are essential post-remediation. Since the fragments left behind can be just as harmful, it is required to have your home small particle cleaned after the remediation. Some remediation companies offer this service but you may need to find a cleaning company that’s willing to follow the small particle clean protocol or you can choose to do it yourself.
Air duct cleaning should also be completed post-remediation. Ideally, it should be done right after the remediation and before the small particle clean. If you can’t accommodate this scheduling, it should be done after the small particle clean and before the build-back. It can also be completed post-build-back if that’s the only way to accommodate your schedule. It’s best to find air duct companies that use vehicle-mounted vacuums to ensure all the particles aren’t being recirculated into the home. It’s critical to make sure they do not use any chemicals during their cleaning process— there shouldn’t be any products used only physical removal.
Post-Remediation HERTSMI-2
The post-remediation HERTSMI-2 should be completed about 8-10 weeks post-remediation. It’s important to only sample new dust for your post-remediation HERTSMI-2. To ensure you’re doing this, you can take biodegradable plastic bags and place them on vertical and horizontal surfaces throughout your home. Rub an electrostatic cloth such as a Swiffer on the bags so they attract more dust. Allow these bags to stay in place for 2-4 weeks to collect enough new dust for your HERTSMI-2 test. Make sure no fans or air filters are blowing on these bags or else they will not collect any dust.
DIY Remediations
We strongly recommend against any DIY remediations of your environment due to the many variables and risks involved. If you are unable to remediate, it is essential to work with your trusted CIRS practitioner to find the best next steps for you whether that’s creating a sanctuary room or a different solution.
While it is also highly recommended to have either a remediation company or a professional cleaning company complete the small particle clean step, this is something that you may be able to do yourself. For individuals taking on the small particle clean, make sure you are prepared with the proper personal protective equipment (PPE).
Below are examples of PPE you may want to consider for the small particle clean as well as cleaning any potentially contaminated belongings:
Closing Thoughts On CIRS Remediation

When thinking about CIRS remediation, it’s essential to highlight the importance of perseverance and hope in the journey toward healing. While the remediation process can be challenging and require a lot of work, it is a crucial step toward root-cause healing. Working with a Shoemaker-trained IEP ensures that your remediation is tailored to your specific needs, avoiding common pitfalls and supporting effective results.
The process begins with accurate testing, such as the ERMI or HERTSMI-2, to assess your home’s mold levels and potential biotoxin exposure. From there, collaboration with a Shoemaker IEP ensures that the remediation process is meticulously managed, preventing further fragmentation of mold and ensuring a thorough cleanup. This careful approach significantly increases the chances of creating a safe and supportive living environment.
It’s important to remember that the goal is not to achieve a completely mold-free or toxin-free environment, which is unrealistic. Instead, we are aiming to create a balanced space that is safe enough to support your healing. With the right steps and professional guidance, it is entirely possible to create a home environment that reduces exposure to harmful biotoxins and promotes recovery.
By committing to the remediation process and seeking the right expertise, you can transform your living space into a sanctuary that fosters healing and well-being. This effort, though demanding, is undoubtedly worth it for the significant improvement in health and quality of life it can bring.
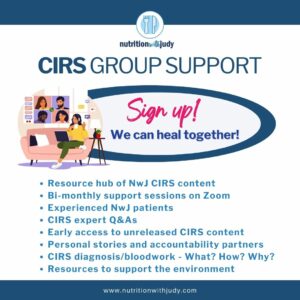
Pro-Tip: Are you looking for more in-depth practitioner resources and a like-minded community to support you through your CIRS journey? Join our exclusive CIRS Support Group for the latest research, step-by-step protocol tools, and support to successfully achieve root-cause healing.
Work With Our Trusted CIRS Practitioners
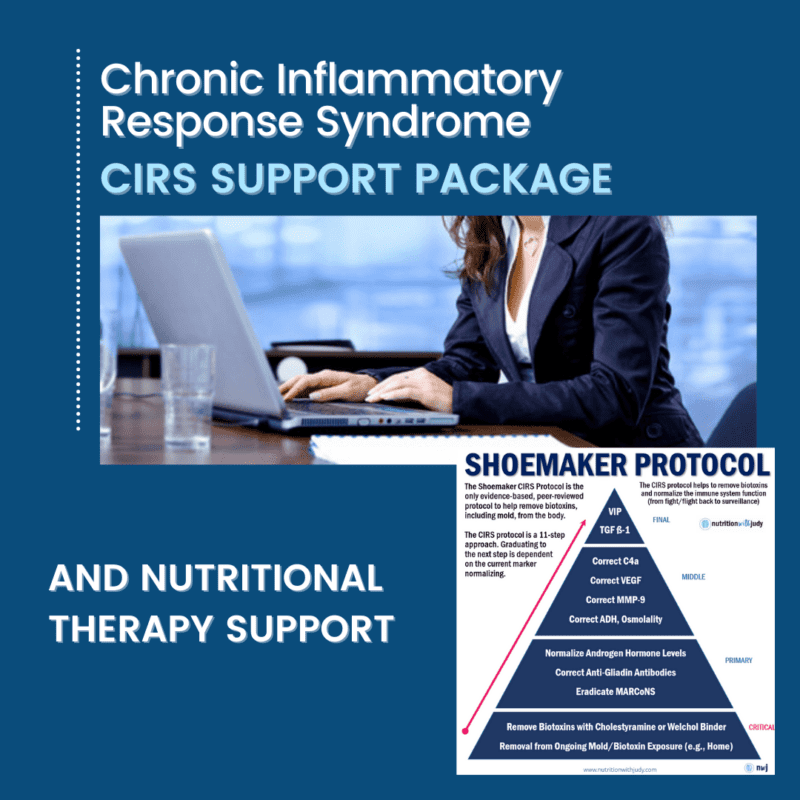
The Nutrition with Judy practice is honored to be a trusted CIRS practitioner support serving clients from around the globe. We’re passionate about helping our clients achieve root-cause healing in order to lead the best quality of life possible that’s nearly symptom-free. Our team is dedicated to finding the answers our patients need. We welcome you to explore our free resources and are always available to support you through personalized protocols. If you’re interested in working one-on-one with our CIRS nutritional therapy team to support you through your journey, our CIRS Support Package delivers the support and accountability for achieving root-cause healing.
DISCLAIMER: This content is for educational purposes only. While we are board-certified in holistic nutrition and are nutritional therapy practitioners, we are not providing medical advice. Whenever you start a new diet or protocol, always consult with your trusted practitioner first.

